Showing posts with label tips. Show all posts

உங்கள் Gmail Account-ஐ பாதுகாப்பது எப்படி ?

GMAIL-இன் பல வசதிகள் நாம் அறிந்ததே.அது மேலும் ஒரு
முக்கியமான வசதி ஒன்றை நமக்கு அளிக்கின்றது.அதாவது
உங்களுடைய Gmail Account எங்கெங்கு login செய்யபட்டுள்ளது
என்று உங்களளுக்கு தெரியப்படுத்தும் வசதிதான் அது .

இது என்ன அவ்வளவு முக்கியமான வசதியா ? என்று நீங்கள்
கேட்கலாம். ஆம் இது ஒரு முக்கியமான சேவை ஏனென்றால்
நீங்கள் வீட்டில் இருந்தபடியே அலுவலகத்தில் உள்ள உங்கள்
கணினியில் Gmail Acoount - ஐ Logout செய்யலாம் அல்லது
வேறு எங்காவது நீங்கள் logout செய்ய மறந்திருந்தால் , இந்த
சேவை உங்களுக்கு நிச்சயம் பயன் அளிக்கும் .

அதை எப்படி உபயோகிப்பது என்று பார்ப்போம் ...


1.Gmail Acoount-ல் Login செய்யவும் ... உங்கள் browser- ல்
Scroll செய்து கிழே வரவும் .Details Link Button-ஐ சொடுக்கவும்...


2.இப்போது நீங்கள் உங்கள் Account Activity Information பார்க்கலாம்.
நீங்கள் சாதாரணமாக Gmail Account-ல் login செய்திருந்தால் இப்படி தெரியும் .


3.இதுவே உங்கள் Gmail Account வேறு இடத்தில் Login செய்யபட்டிருந்தால்
உங்களுக்கு இப்படி தெரியும்.Click Details...


4.இப்போது நீங்கள் உங்கள் Account Activity Information பார்க்கலாம்.
உங்கள் Gmail Account இரண்டு இடத்தில் login செய்திருந்தால் இப்படி தெரியும் .


5.Click Sign out all other sessions....


5. அவ்வளவுதான் நீங்கள் மற்ற இடங்களில் logout
செய்துவிட்டீர்கள்
.உங்கள் Account பாதுகாக்கப்பட்டது ....
Have Fun;) மேலும் தகவல்களுக்கு...

FireFox -ல் உங்கள் Password-களை பாதுகாப்பது எப்படி ?

நம் எல்லோருக்கும் "Save Passwords" பற்றி தெரியும் ...நீங்கள்
இந்த சேவையை உபயோகிக்கும் போது யார் வேண்டுமானாலும்
உங்கள் Account -இல் login செய்யலாம் ...ஏன் என்றால் UserName and
Password ஏற்கனவே சேமிக்க பட்டிருக்கும் ,உங்கள் password
திருடபப்டும் ஆபத்து உள்ளது .இதை தவிர்க்க நாம் "Master Password"
உபயோகம் செய்வதுதான் ஒரே வழி .


ஆனால் நம்மில் பலருக்கு "Master password" பற்றி தெரியாது.
Master Password என்பது உங்கள் FireFox-இன் Password.நீங்கள்
FireFox open செய்யும்போது நாம் "Master Password" கொடுக்க வேண்டும் .
அந்த வசதியாய் எப்படி பெறுவது என்று பார்ப்போம்.....


1.Open FireFox, Goto Tools -> Options ->Security Tab


2.Check Use a master password ....


3.Click Change Master Password...


4.Enter your desired password and click Ok...


5.when you open firefox next time ,It will prompt to
enter master password...


6.Enter the Master password and you are secure now
to save password for any site,nobody can access your
saved UserName and Password without your master
password.... Have Fun;)

Free Hide Folder மூலம் உங்கள் கோப்புகளை பாதுகாப்பது எப்படி ?

உங்கள் கணினியில் உள்ள Folders
சில முக்கியமான தகவல்கள் இருக்கும் .
அதை மறைத்து வைப்பது என்பது பெரும்பாடு.

அந்த மாதிரியான Folders பாதுகாப்பது
எப்படி என்று பார்ப்போம்.இதற்கு சுலபமான
ஒரு
வழி இருக்கின்றது ...கிழ்கண்ட எளிய வழிமுறை
பின்பற்றி நீங்களும் பயனடையலாம்....


1.இந்த link-ஐ கிளிக் செய்து Free Hide Folder
மென்பொருளை
Download செய்து கொள்ளுங்கள்.


2.Install FreehideFolder.exe.... At the end of the installation
you need to enter the password for the software...After entering
your desired password click ok to continue....


3.Click Skip to continue...


4.Now Click Add and Select Folder(s).In this example
C:\Redmage-Photos Folder is selected...


5.After adding the folder you need to backup those info.
Click backup and give desired name and Save...


6.Now Folder is hidden in the computer...Close the Software.
Check your (hided) folder in the computer.you cant see the folder...


7.If you want to view the folder,you need to open the
free hide folder and need to change the setting into UnHide Folder...
After Editing the file contents of the folder you can change the setting
into hide folder(vice-versa)...


7.you must remember password for free hide folder and save the
backup file to the safe place....Have Fun;)

Yahoo-வில் Sign-In Seal உருவாக்குவது எப்படி ?

நீங்கள் YahooMail என்று சொடுக்கினால் உங்களுக்கு
தெரிவது சில சமயம் phishing and scam பக்கங்களாக
இருக்கும் , இந்த பக்கங்களில் login செய்தால்
உங்கள் UserName and Password திருடப்படும்.
இதுபோன்ற phishing மற்றும் Scam இருந்து தப்பிக்க ,
yahoo- வில் ஒரு சுலபமான வழி இருக்கின்றது.

நீங்கள் Sign-In Seal உருவாக்குவதுதான் ஒரே வழி.
கிழ்கண்ட எளிய முறையை பின்பற்றி ,நீங்களும்
Sign-in Seal உருவாக்கி உங்களை பாதுகாத்து கொள்ளலாம் .

1. நீங்கள் yahoomail login Page -க்கு செல்லவும்...


2. Create your sign-in seal சொடுக்கவும்....


3.இப்போது உங்களுக்கு இரண்டு Option தெரியும் ,
இங்கே Create a text seal... பற்றி விளக்கம் அளிக்கப்பட்டுள்ளது.
உங்கள் பெயர் அல்லது கம்பெனி பெயர் எதுவாயினும்
டைப் செய்து ,வேண்டிய நிறத்தையும் தேர்வு செய்து கொள்ளுங்கள்
பின்பு Preview Button - சொடுக்குங்கள் ....


4,இப்போது உங்கள் மாதிரி sign-in seal தெரியும் ,அதை
சேமிக்க Save This Seal சொடுக்கவும் அல்லது மாற்ற
Remove சொடுக்கவும் .


5.உங்கள் உபயோகத்தை பொறுத்து This computer
அல்லது Your other computers தேர்வு செய்யவும்.


6.இப்போது உங்கள் sign-in seal தயார் ...
இப்போது login page - ல் உங்கள் sign-in seal தெரியும்.


(பி -கு )
நீங்கள் அடுத்த தடவை yahoomail.com login செய்யும்போது
நீங்கள் உருவாக்கிய sign-in seal தெரிய வேண்டும்
இல்லயென்றால் நீங்கள் உஷாராக இருக்க
வேண்டும் , அது phishing அல்லது Scam
பக்கங்களாக இருக்கக்கூடும்...

60 விண்டோஸ் Short Cuts....


விண்டோஸ் shortcut - இன் பயன்பாடுகள் என்னவென்றால் ,நாம்
அதி விரைவாக நமக்கு வேண்டிய Programs - களை செயல்படுத்தலாம்.
உதாரணம் :
நீங்கள் Run Prompt - ல், appwiz.cpl
என்று டைப் செய்து ஓகே சொடுக்கினால்
Add or Remove Programs சென்றடையலாம்.
(Start-->Settings-->Control Panel --> Add or Remove Programs
இதன் மாற்றுதான் appwiz.cpl)

These are the shortcuts for windows,enjoy...have fun;)
  1. appwiz.cpl -- Used to run Add/Remove wizard
  2. Calc -- Calculator
  3. Cfgwiz32 -- ISDN Configuration Wizard
  4. Charmap -- Character Map
  5. Chkdisk -- Repair damaged files
  6. Cleanmgr -- Cleans up hard drives
  7. Clipbrd -- Windows Clipboard viewer
  8. Control -- Displays Control Panel
  9. Cmd -- Opens a new Command Window
  10. mouse -- Used to control mouse properties
  11. Dcomcnfg -- DCOM user security
  12. Debug -- Assembly language programming tool
  13. Defrag -- Defragmentation tool
  14. Drwatson -- Records programs crash & snapshots
  15. Dxdiag -- DirectX Diagnostic Utility
  16. Explorer -- Windows Explorer
  17. Fontview -- Graphical font viewer
  18. Fsmgmt.msc -- Used to open shared folders
  19. Firewall.cpl -- Used to configure windows firewall
  20. Ftp -- -ftp.exe program
  21. Hostname -- Returns Computer's name
  22. Hdwwiz.cpl -- Used to run Add Hardware wizard
  23. Ipconfig -- Displays IP configuration for all network adapters
  24. Logoff -- Used to logoff the computer
  25. Lusrmgr.msc -- Opens UserAccount Manager
  26. Mspaint -- Open a new Microsoft Paint.
  27. MMC -- Microsoft Management Console
  28. Msconfig -- Configuration to edit startup files
  29. Mstsc -- Used to access remote desktop
  30. Mrc -- Malicious Software Removal Tool
  31. Msinfo32 -- Microsoft System Information Utility
  32. Notepad -- Opens a new text document
  33. Nbtstat -- Displays stats and current connections using NetBIOS over TCP/IP
  34. Netstat -- Displays all active network connections
  35. Nslookup -- Returns your local DNS server
  36. Osk ---Used to access on screen keyboard
  37. Perfmon.msc -- Used to configure the performance of Monitor.
  38. Ping --Sends data to a specified host/IP
  39. Powercfg.cpl -- Used to configure power option
  40. Regedit --Registry Editor
  41. Regwiz -- Registration wizard
  42. Services.msc -- System File Checker
  43. Sfc /scannow -- System File Checker
  44. Sndrec32 -- Sound Recorder
  45. Shutdown -- Used to shutdown the windows
  46. Spider -- Used to open spider solitaire card game
  47. Sndvol32 -- Volume control for soundcard
  48. Sysedit -- Edit system startup files
  49. Taskmgr -- Task manager
  50. Telephon.cpl -- Used to configure modem options.
  51. Telnet -- Telnet program
  52. Tracert --Traces and displays all paths required to reach an internet host
  53. Winchat -- Used to chat with Microsoft
  54. Wmplayer -- Used to run Windows Media player
  55. Wab -- Used to open Windows address Book.
  56. WinWord -- Used to open Microsoft word
  57. Winipcfg -- Displays IP configuration
  58. Winver -- Used to check Windows Version
  59. Wupdmgr -- Takes you to Microsoft Windows Update
  60. Write -- Used to open WordPad

விஸ்டாவின் வேகத்தை அதிகப்படுத்த மேலும் ஒரு வழி

விஸ்டாவில் மிக முக்கியமானது அதன் அட்டகாசமான தோற்றம் .
அதற்கு விஸ்டா நிறைய மெமரி செலவிடுகின்றது , அதை
குறைத்தால்
போதும் ,அதன் வேகம் அதிகரிக்கும் .

கிழ்கண்ட எளிய வழிமுறை பயன்பற்றி நீங்களும்
உங்கள் விஸ்டாவின் வேகத்தை கூட்டலாம்.

1.Right Click My Computer and Select Properties.


2.Click Advanced system settings.


3.Under the Performance group,Select Settings...


4.Select "Adjust for best performance" and click Ok.thats all

5.Now you can see your system performace is improved very much.;)

விஸ்டாவின் வேகத்தை USB மூலம் அதிகபடுத்துவது எப்படி ?

விண்டோஸ் விஸ்டாவின் வேகத்தை அதிகப்படுத்த
நாம் USB (Pendrive) பயன்படுத்தலாம் .கிழ்கண்ட எளிய
வழிமுறை பயன்பற்றி நீங்களும் உங்கள் விஸ்டாவின்
வேகத்தை கூட்டலாம்.

1.USB உங்கள் கணினியில் இணையுங்கள் .
Speed up my system using windows Readyboost சொடுக்குங்கள் .


2. Under ReadBoost Tab ,Click Use this device and Select
how much memory you will reserve.Clik Apply.Thats all.have fun

Delete “access denied” folders or files

நண்பர்களே சில சமயம் நமது கணினி வைரஸ் தாக்குதலுக்கு உள்ளாகும்போது
நாம் file or folder delete செய்ய முடியாது .அந்த மாதிரியான file or folder எப்படி delete
செய்வது என்று பார்ப்போம்.

1.Right Click folders or files and Select Properties.

2.Click Secutity Tab


3.Highlight the Administrators group, and then click Remove. You should not have to highlight any other groups or user names.


4.click on "OK" to the above message, and then click the “Advanced” button.


5.Uncheck the box for “Allow inheritable permissions .... especially defined here……”


6.When prompted with another dialog “selecting this option means the parent permission entries…… will no longer be applied to this object” click “Remove”.
7.After Removing, you will see the blank Advance tab.


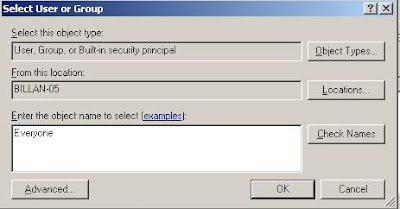
8.click Add.In the Select User or Group dialog, type in “Everyone” (no quotes) in the “Enter the object…” field, then click on "OK"


9.In the Permissions Entry dialog, check off “Full Control”. All other boxes should automatically be checked off. Click on "OK".


10.After Adding "Everyone",It should Appear like this...


11.Click Apply and Goto Owners Tab.


12.Click OtherUsers or Groups and Add Everyone and Click Ok.


13.After Adding "Everyone",It should Appear like this...


14.Highlight Everyone and check Replace owner on subcontrainers and objects.

15.when prompted for a nessage click ok and then Apply.

16.Try to delete the folder or files.

Note:
You may need to reboot the PC in order to release the current security settings from memory. Once restarted, try deleting the items again. If removing malware from a PC, this is a good start toward disabling the software, especially where Add/Remove Programs, or registry key deletions have not worked.